
Python vs. C++ ROS 2 Package Structure
Compare Python and C++ ROS 2 package structures. Learn key file differences like setup.py vs CMakeLists.txt and when to use each for your robot apps.

Share :
Quick answer
Compare Python and C++ ROS 2 package structures. Learn key file differences like setup.py vs CMakeLists.txt and when to use each for your robot apps.
Quick Answer
Compare Python and C++ ROS 2 package structures. Learn key file differences like setup.py vs CMakeLists.txt and when to use each for your robot apps.
Who This Is For
- ROS 2 Learner
- Robotics Student
- Software Developer
What You Will Learn
- What ROS 2 means in practical robotics.
- How this topic connects to real robot projects.
- What to learn or build next after this article.
Python and C++ are both frequently used for creating robotic software in the ROS 2 (Robot Operating System) space. Nonetheless, there are notable differences in the ROS 2 package structure between these two languages. These distinctions may seem needless or confusing at first. For example, why does a Python package use a setup.py, but a C++ ROS 2 package needs a CMakeLists.txt?
A closer examination of each language's fundamental characteristics, build systems, and roles within the ROS 2 ecosystem is necessary to comprehend the causes of these variations.
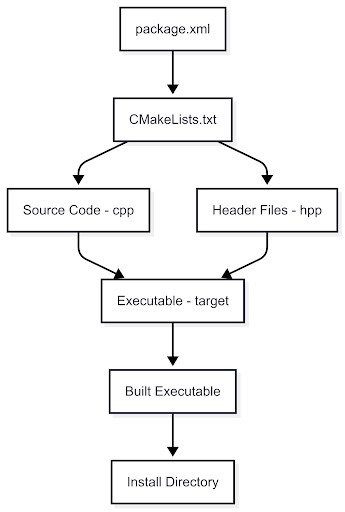
Part 1: The Anatomy of a C++ ROS 2 Package Structure (The Compiled World)
C++ is a compiled language, which means your source code must be converted into machine-readable code before execution. This step is done by a compiler. The structure of a C++ ROS 2 package is built around this compilation process, with multiple files and directories that support the build system. Here's an overview of the key components and their roles.
The Jargon: Key Terms in C++ ROS 2
- Source Code : The .cpp files containing your logic and function implementations.
- Header Files : Files with .hpp or .h extensions containing declarations and class definitions, acting as the "public API" of your code.
- Compiler : A program (such as g++) that compiles your source code into object files.
- Linker : A program that connects the compiled object files and required libraries to generate an executable.
- Build System (CMake) : Manages the compile and link process. You do not manually type in g++ commands; instead, the instructions are written in CMakeLists.txt.
- Target : An entity (executable or library) that the build system will generate.
File Breakdown
- package.xml****
- Purpose: This file serves as the "ID card" of the package. It defines essential metadata such as the package name, version, author, and dependencies.
- Key Line: ament_cmake. This line tells ROS 2 to use CMake for building the package.
- CMakeLists.txt****
- Purpose: This is the heart of the build system, where all compilation and linking instructions are specified.
- Key Commands:
- find_package(rclcpp REQUIRED): Tells CMake to locate the rclcpp library, essential for ROS 2 C++ development.
- add_executable(my_node src/my_node.cpp): This command creates an executable target named my_node from the source file src/my_node.cpp.
- ament_target_dependencies(my_node rclcpp): Links the executable to the necessary ROS 2 libraries.
- install(TARGETS my_node DESTINATION lib/${PROJECT_NAME}): Ensures that the generated executable is placed in the appropriate directory for ROS to run it.
- src/: This directory contains the source files (.cpp) for the node.
- include/package_name/: This directory holds header files (.hpp), which provide the interface for other parts of the code to interact with the node.
Writing and Building a C++ Node
A C++ ROS 2 node typically involves creating a class that inherits from the rclcpp::Node class. Below is an example C++ node that publishes messages to a topic.
cpp
#include "rclcpp/rclcpp.hpp"
#include "std_msgs/msg/string.hpp"
class MyCppNode : public rclcpp::Node
{
public:
    MyCppNode() : Node("cpp_talker_node")
    {
        publisher_ = this->create_publisher<std_msgs::msg::String>("my_topic", 10);
        timer_ = this->create_wall_timer(
            std::chrono::seconds(1),
            std::bind(&MyCppNode::timer_callback, this));
        RCLCPP_INFO(this->get_logger(), "C++ Talker Node has been started.");
    }
private:
    void timer_callback()
    {
        auto msg = std_msgs::msg::String();
        msg.data = "Hello from C++ Node!";
        publisher_->publish(msg);
    }
    rclcpp::Publisher<std_msgs::msg::String>::SharedPtr publisher_;
    rclcpp::TimerBase::SharedPtr timer_;
};
int main(int argc, char*argv [])
{
    rclcpp::init(argc, argv);
    rclcpp::spin(std::make_shared<MyCppNode>());
    rclcpp::shutdown();
    return 0;
}
Next, modify CMakeLists.txt to instruct the build system on how to compile the node:
cmake
find_package(rclcpp REQUIRED)
find_package(std_msgs REQUIRED)
add_executable(cpp_talker src/my_cpp_node.cpp)
ament_target_dependencies(cpp_talker rclcpp std_msgs)
install(TARGETS cpp_talker DESTINATION lib/${PROJECT_NAME})
Finally, build the package using colcon build.
Part 2: The Anatomy of a Python Package (The Interpreted World)
Python, in contrast to C++, is an interpreted language. This means that Python code is executed directly by the Python interpreter without needing to compile it beforehand. As such, the structure of a Python ROS 2 package is simpler and designed to facilitate direct execution of the Python scripts.
The Jargon: Key Terms in Python ROS 2
- Interpreter : The program (python3) that reads and executes Python code.
- Script : A .py file that contains executable code.
- Module : A Python file designed to be imported by other scripts.
- Package : A directory containing Python modules, along with aninit.py file to mark it as a package.
- Entry Point : A reference in setup.py that designates a function to be executed when the script is run.
File Breakdown
- package.xml****
- Purpose: Just like in C++, it serves as the "ID card" of the Python package.
- Key Line: ament_python. This line tells ROS 2 to use the Python-specific build and install process.
- setup.py****
- Purpose: This file contains the installation instructions for the Python package. There is no compilation involved here. Key Section:
python
entry_points={
    'console_scripts': [
        'py_talker = my_python_package.my_py_node:main',
    ],
}
- This section tells ROS 2 to create a script named py_talker, and when executed, it will call the main function in my_py_node.py.
- setup.cfg: A simple configuration file to tell the build tools where to find the Python files declared in setup.py.
- package_name/: This directory holds the Python package's modules and other Python files (.py).
Writing and "Building" a Python Node
Here's an example of a basic Python node that publishes a message to a topic:
python
import rclpy
from rclpy.node import Node
from std_msgs.msg import String
class MyPyNode(Node):
    def __init__(self):
        super().__init__('py_talker_node')
        self.publisher_ = self.create_publisher(String, 'my_topic', 10)
        self.timer_ = self.create_timer(1.0, self.timer_callback)
        self.get_logger().info("Python Talker Node has been started.")
    def timer_callback(self):
        msg = String()
        msg.data = "Hello from Python Node!"
        self.publisher_.publish(msg)
def main(args=None):
    rclpy.init(args=args)
    node = MyPyNode()
    rclpy.spin(node)
    node.destroy_node()
    rclpy.shutdown()
if __name__ == '__main__':
    main()
In setup.py, define the entry point:
python
entry_points={
    'console_scripts': [
        'py_talker = my_python_package.my_py_node:main',
    ],
}
Finally, build the package with colcon build, which will create an executable wrapper.
Part 3: Common Tasks - Libraries and Launching
Adding a Library
- C++ :
- Create a new file my_lib.hpp and my_lib.cpp. In CMakeLists.txt, add:
cmake
add_library(my_cpp_lib src/my_lib.cpp)
target_link_libraries(cpp_talker my_cpp_lib)
- Include it in your node file with #include "package_name/my_lib.hpp".
- Python :
- Create a new file my_lib.py in the package directory.
- In your node file, import it with:
python
from my_python_package.my_lib import MyClass
Launching Both Nodes
Both C++ and Python nodes can be launched using the same launch file. This Python-based launch file will start both nodes:
python
from launch import LaunchDescription
from launch_ros.actions import Node
def generate_launch_description():
    return LaunchDescription([
        Node(
            package='my_cpp_package',
            executable='cpp_talker',
            output='screen'
        ),
        Node(
            package='my_python_package',
            executable='py_talker',
            output='screen'
        ),
    ])
Run it using ros2 launch my_cpp_package my_launch_file.launch.py.
Part 4: The Mixed Package (C++ and Python Together)
Sometimes, you need both the performance of C++ and the flexibility of Python in the same ROS 2 package. In such cases, follow these steps:
- Build Type : Use ament_cmake for the primary build type in package.xml.
- File Structure : Keep C++ files in src/ and include/, and Python files in a separate directory, such as scripts/ or python/.
- CMakeLists.txt : Build C++ executables and libraries as usual. For Python, simply copy the scripts:
cmake
install(DIRECTORY scripts/ DESTINATION lib/${PROJECT_NAME})
- Dependencies : Ensure rclcpp and rclpy are both listed as dependencies in package.xml.
Conclusion
The split between C++ and Python ROS 2 packages is largely a result of the fundamental differences between compiled and interpreted languages. C++ packages require complex build systems due to the need for compilation, while Python packages are simpler, focusing more on script execution. By understanding these structural differences, you can more effectively navigate the world of ROS 2, making smart decisions on when to use C++ for performance or Python for rapid development. For a deeper dive into official ROS 2 package guidelines, refer to the Open Robotics ROS 2 tutorials on GitHub -a trusted and actively maintained resource used by professionals. At Robotisim, we guide you step-by-step in applying these tools to real robots, with dedicated lessons on ROS 2 C++ and Python workflows.
Practical Example
A practical way to use this article is to connect the concept to a small robot workflow: identify the input, the processing step, and the output you expect from the robot. If the article involves ROS 2, test the idea in a small workspace or simulation before applying it to a larger robot project.
Common Mistakes
- Trying to memorize the term without connecting it to a robot behavior.
- Skipping the prerequisite concepts that make the workflow easier to debug.
- Copying commands or code without checking what each node, topic, file, or parameter is responsible for.
- Treating one tutorial as a complete roadmap instead of linking it to the next concept.
How This Connects to Other Topics
- 3D Printing Robotics Hardware for an Autonomous Robot Build
- How to Collect Raw Sensor Data for Robotics with ROS 2
- How to Add Custom Libraries to a ROS 2 Python Package
- How to Start Developing in ROS 2: A Beginner-Friendly Guide
- How to Finish Your First ROS Robotics Project
Learn Next
- 3D Printing Robotics Hardware for an Autonomous Robot Build
- How to Collect Raw Sensor Data for Robotics with ROS 2
- How to Add Custom Libraries to a ROS 2 Python Package
- How to Start Developing in ROS 2: A Beginner-Friendly Guide
- How to Finish Your First ROS Robotics Project
- ROS 2 Foundation Path
FAQ
Is Python vs. C++ ROS 2 Package Structure suitable for beginners?
Yes. The article is written to make the concept easier to understand, while still connecting it to practical robotics work.
What should I learn before this topic?
Start with the prerequisite ideas listed in the article, then connect them to a small project or simulation so the concept becomes concrete.
How does this topic connect to real robots?
It helps you understand how software, sensors, control, simulation, or career decisions show up in practical robot development.
What should I do after reading this article?
Pick one related concept from the Learn Next section and build a small example that uses it.
Can I learn this through Robotisim?
Yes. Robotisim connects these concepts to structured learning paths and project-based robotics practice.
Final Summary
Python vs. C++ ROS 2 Package Structure is part of the broader ROS 2 Learning learning path. The key is to understand the concept, connect it to a real robot workflow, and then practice it through a focused project instead of learning it in isolation.
This article supports ROS 2 Foundation Path, especially ROS 2.
Learn with Robotisim
Start learning ROS 2 step by step inside Robotisim.
Explore the academyLearn next

3D Printing Robotics Hardware for an Autonomous Robot Build
Discover how to 3D print robotics hardware for building autonomous robots. Learn key steps from assembly to motion control with ROS 2
Read more
How to Collect Raw Sensor Data for Robotics with ROS 2
Learn to integrate sensors with ROS 2 and collect raw sensor data for robotics. Guide on real time data processing and sensor fusion for autonomous robots.
Read more
How to Add Custom Libraries to a ROS 2 Python Package
Learn to create custom libraries for ROS 2 Python packages. Enhance your robotics projects with reusable code and improve your development workflow!
Read more
How to Start Developing in ROS 2: A Beginner-Friendly Guide
Begin your ROS 2 development journey with our guide. Learn key concepts and setup for creating effective robotics applications in no time!
Read more